A colleague wanted to learn fuzzing and they picked SNMP as the protocol they wanted to target. The plan was to find the oldest version of Net-SNMP we can find to fuzz so they’re more likely to find a crash. We checked out a release from 2000, but couldn’t get the configure script to work, then jumped to Net-SNMP v5.6.1, which is still a very old version of Net-SNMP from 2011. It didn’t compile immediately but I felt that it could be coaxed into compiling.
I managed to get this version to compile, but it wasn’t straightforward. The first thing we need to do is compile a version of OpenSSL that is from around 2011 as the API has changed enough to break things, and it was necessary to disable some features in Net-SNMP we didn’t need. I should note that although I have got this to compile and I can run “snmpget -v”, I have not tested this build in any meaningful way so I may not work.
The first thing to do is set a variable to hold the path of where we will install everything, this is used as the –prefix argument passed to autoconf.
PREFIX_DIR=$HOME/snmp/_output
OpenSSL
Let’s grab a copy of the OpenSSL source code and checkout a version from around 2011.
This time we have a more complicated configure setup. The first thing to note is we use “–with-openssl” to point autoconf at the OpenSSL we just built. The next thing to note is we disable Perl and Python moudules, this is because they also will not work with the newest version so those packages.
Next we can compile using make, this time we can use parallel build. We set LDFLAGS here to force the linker to chose the OpenSSL we built, and not the system version.
make -j$(nproc) LDFLAGS="-L${PREFIX_DIR}/lib"
make install
This is a quick guide to enabling I2C support on the Raspberry PI operating system Raspbian. This may work on the other Linux based distros available for the Pi but I have not checked.
Next we need to enable the kernel drivers for I2C, by default the drivers are blacklisted so we must un-comment the lines that include “i2c-bcm2708”
sudo nano /etc/modprobe.d/raspi-blacklist.conf
Then add the kernel module “i2c-dev” to /etc/modules
sudo nano /etc/modules
Then finally reboot the Pi
sudo reboot
Using the I2C Command Line Tools
The i2c-tools package provide a number tools for operating on the I2C bus using the command line. The first is i2cdetect which scans the bus for devices and then prints an address map.
i2cdetect -y 1
The next is i2cset, this is a tool that allows you to set register values on an I2C device. The first argument after the bus is the chip address, then the register address and finally the value to write. All of the arguments are in decimal.
i2cset -y 1 <chip> <addr> <value>
The opposite to the set command is i2cget, this reads a register on an I2C device.
i2cget -y 1 <chip> <addr>
Another tool is i2cdump which reads out all of the registers of a I2C device.
When developing software that uses a serial port for communication with the outside world it is really helpful to be able to use a virtual serial port and write test code to aid in debugging. Well it turns out there is a program that does that in Linux, it’s called socat. Using this utility you can create a pair of virtual serial ports and connect them together. To install it in Ubuntu run the following commands.
sudo apt-get update
sudo apt-get install socat
Once you have the socat program installed you just need to run the following command to create a pair of virtual tty devices. When you run the program it will print out which ports you need to use.
socat -d -d PTY,b57600 PTY,link=ttyVS1,b57600
This is an example of the output that socat produces. The two ports it has created are /dev/pts/5 and /dev/pts/6. These can vary from time to time so keep an eye on that.
2013/11/15 07:47:13 socat[2970] N PTY is /dev/pts/5
2013/11/15 07:47:13 socat[2970] N PTY is /dev/pts/6
2013/11/15 07:47:13 socat[2970] N starting data transfer loop with FDs [3,3] and [5,5]
I recently brought a USB DVB-T dongle that is based on the Realtek RTL2832U chip which, with RTLSDR, can be used as a really low cost SDR. This is because it can be setup to return the raw I/Q samples to the host PC. Once you have the samples they can then be processed, I tend to use GNURadio for the processing.
There is a script available that downloads and installs everything, RTLSDR, GNURadio, and more. I recomend you try it first. I think there is also a new project from the GNURadio people that will automate building and installing. I had had some issues with building gr-audio when I wrote this so I use the manual method of building the code for now.
Once you have made sure you have all of the libraries that GNURadio needs you can build the code.
mkdir build cd build cmake ../ make && make test
sudo make install
This whole process can take a while to complete. On my work machine it took nearly 40mins! I had an issue building the gr-audio on my laptop that I still haven’t been able to resolve.
Next I built downloaded and extracted the RTLSDR source code. As with GNURadio we need to create a build directory and run cmake.
mkdir build cmake ../ make
Then I ran a few commands to check that the code and the dongle worked correctly. The first tests to make sure samples are being returned at the correct rate and the second will receive and demodulate a WBFM station.
Recently I wondered how you control CPU throttling in GNU/Linux systems so after doing a little research this script is what I’ve come up with. It’s based on some others that I’ve come across. All it does is set the CPU throttling mode to “performance” then displays the current CPU frequency setting, which should be full speed.
#!/bin/sh
for CPUGOV in /sys/devices/system/cpu/cpu*/cpufreq/scaling_governor
do
    echo -n performance > $CPUGOV;
done

# Display Stats about new settings
grep -E '^model name' /proc/cpuinfo | head -n 1
for CPUFREQ in /sys/devices/system/cpu/cpu*/cpufreq/scaling_cur_freq
do
    cat  $CPUFREQ | awk '{ print $1 / 1e6 "GHz"; }'
done

exit 0
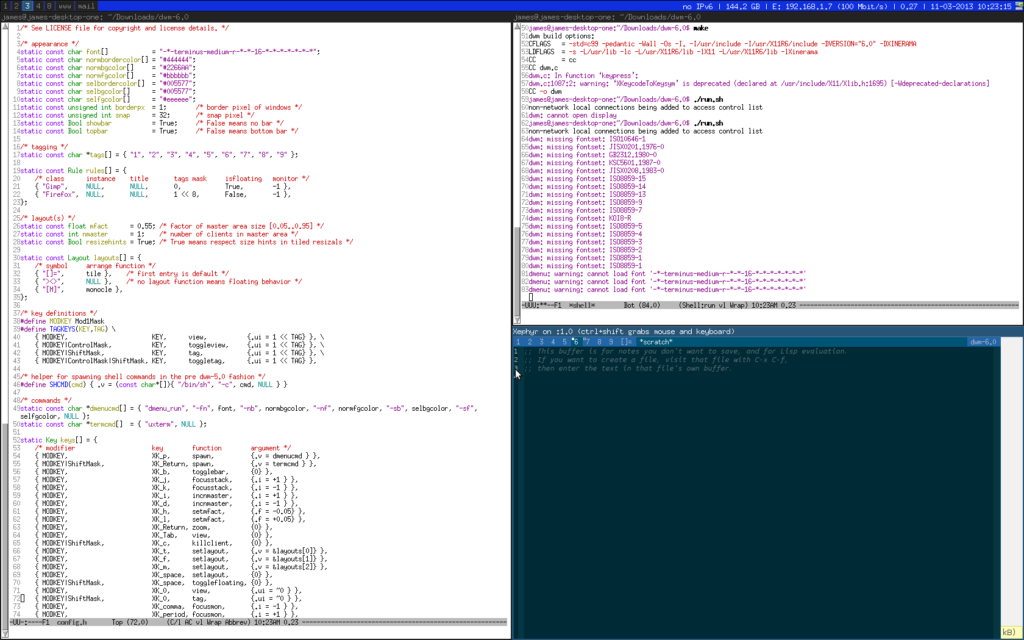
I use i3 as my main window manager but I like to play around with others so I know what’s out there. One of the window managers that I find very interesting is dwm. It is a very small window manager, about 2k lines of code and you configure it my changing a header file and re-compiling. Definitely not beginner-friendly!
To make playing easier I wanted to run dwm inside i3, that way I don’t have to keep logging in and out. I could have used a VM but the same problem would exist. Below is the shell script I use to do this. I found out how to do this from LinuxExchange.
For some reason I need to run dwm twice before it works, the first time it says “dwm: cannot open display”. Anyone know why this is happening? Below is a screenshot of dwm running emacs, it is the bottom right panel. The panel to the left is emacs editing the config.h file.
So far I have modified the background colour of the status bar and set the status message. To set the status message all you need to do is set the WM_NAME property of the root window. Most systems have a utility that lets you do this in the command line.
xsetroot -name “Hello World”
You can also use this utility to change the background colour, I did a similar thing for i3.
My current project is a control system that runs on a small embedded PC running a Linux OS. I had a problem during development where I had to open/close two serial ports alternatively because they shared an interrupt. Doing this suddenly caused the software to crash after running for a few minutes. The problem turned out to be that I was leaking file descriptors!
I wrote a simple shell script that prints the the total file descriptors open on the serial ports. This helped me make sure my bug fix worked correctly.
In the end I manually control the serial port using the sys module instead of using pySerial. I still have no idea why pyserial started leaking resources.
We use cookies on our website to give you the most relevant experience by remembering your preferences and repeat visits. By clicking “Accept All”, you consent to the use of ALL the cookies. However, you may visit "Cookie Settings" to provide a controlled consent.
This website uses cookies to improve your experience while you navigate through the website. Out of these, the cookies that are categorized as necessary are stored on your browser as they are essential for the working of basic functionalities of the website. We also use third-party cookies that help us analyze and understand how you use this website. These cookies will be stored in your browser only with your consent. You also have the option to opt-out of these cookies. But opting out of some of these cookies may affect your browsing experience.
Necessary cookies are absolutely essential for the website to function properly. These cookies ensure basic functionalities and security features of the website, anonymously.
Cookie
Duration
Description
cookielawinfo-checkbox-analytics
11 months
This cookie is set by GDPR Cookie Consent plugin. The cookie is used to store the user consent for the cookies in the category "Analytics".
cookielawinfo-checkbox-functional
11 months
The cookie is set by GDPR cookie consent to record the user consent for the cookies in the category "Functional".
cookielawinfo-checkbox-necessary
11 months
This cookie is set by GDPR Cookie Consent plugin. The cookies is used to store the user consent for the cookies in the category "Necessary".
cookielawinfo-checkbox-others
11 months
This cookie is set by GDPR Cookie Consent plugin. The cookie is used to store the user consent for the cookies in the category "Other.
cookielawinfo-checkbox-performance
11 months
This cookie is set by GDPR Cookie Consent plugin. The cookie is used to store the user consent for the cookies in the category "Performance".
viewed_cookie_policy
11 months
The cookie is set by the GDPR Cookie Consent plugin and is used to store whether or not user has consented to the use of cookies. It does not store any personal data.
Functional cookies help to perform certain functionalities like sharing the content of the website on social media platforms, collect feedbacks, and other third-party features.
Performance cookies are used to understand and analyze the key performance indexes of the website which helps in delivering a better user experience for the visitors.
Analytical cookies are used to understand how visitors interact with the website. These cookies help provide information on metrics the number of visitors, bounce rate, traffic source, etc.
Advertisement cookies are used to provide visitors with relevant ads and marketing campaigns. These cookies track visitors across websites and collect information to provide customized ads.